The following elements are necessary to create transmitted light photographs of flat individual paper items, schematized on the right:
Paper item
Light source
Camera
Stabilization
Masking
Transparent, rigid material
The object should be unmounted for successful penetration of light and illumination of internal structure. The light source should be flat and even in intensity. The camera and lens recommended for minimal spatial distortion is a full-frame DSLR with a 50-60 mm prime lens. As much as possible, the camera should be level to the plane of the item and pointed directly over the center of the paper. The camera should be stabilized with a tripod or copy stand. Opaque, flat masking material, such as foam core or mat board, may be placed around or just over the edges of the paper item; weighting the masking in place may further minimize light leakage. If the item does not naturally lie very flat, it may be photographed through a piece of transparent acrylic or glass.
Schematized setup for transmitted light photography of flat, unmounted paper: 1.) Paper item; 2.) Light source; 3.) Camera; 4.) Stabilization; 5.) Masking; 6.) Transparent, rigid material
File format
In order to obtain the highest quality image files, the camera should generate images in a camera RAW format. Proprietary RAW formats, such as NEF files, may be converted to DNGs, which is a universal, non-proprietary camera RAW format. The RAW files may be converted to and saved as TIFFs for archival storage and structure analysis with watermarkPointMarker/visualizeOverlays, chainLineMarker, and laid line density mapping. JPEGs may also be used to analyze structure, but are less ideal because of their tendency to lose information in compression. For best results, store permanent copies of RAW camera files as generic DNGs and 16-bit TIFFs, and convert to JPEGs as needed for sharing.
Camera Capabilities
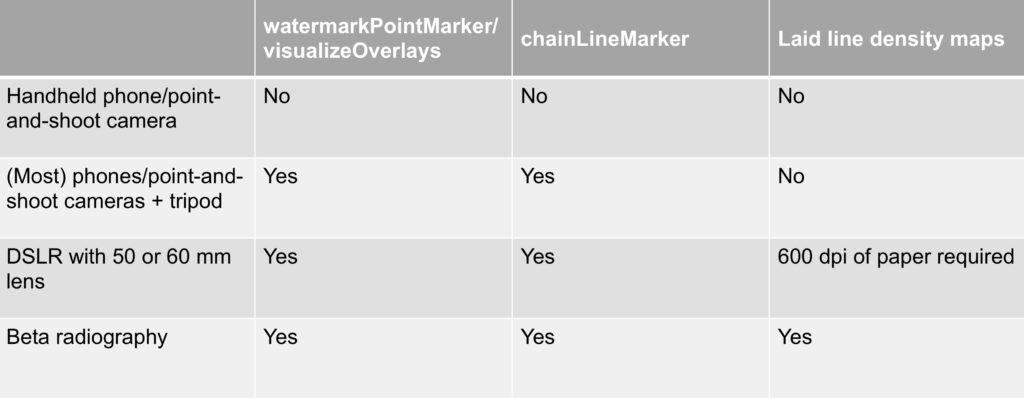
Although the best results may be obtained by using a DSLR camera with a prime lens, sufficient images may be created with a variety of cameras, particularly for imaging watermarks. The usefulness of images created with phone and point-and-shoot cameras is outlined in the table on the right. Leveling, stabilizing, and centering the camera will ensure the creation of the best possible images with the available equipment. Laid line density maps require particularly high-resolution images. There should be approximately 600 pixels per inch of the paper item. Beta radiography remains an ideal imaging technique for institutions with access to the type of necessary, specialized equipment.
Current recommendations for minimum camera setup required for watermarkPointMarker/visualizeOverlays, chainLineMarker, and laid line density mapping.
Parties interested in submitting images of cardinal’s hat, flower, eagle, scissors, bull’s head, horn, or other watermarks occurring in Leonardo’s papers for comparison with those in the working compendium are encouraged to email contact@leocode.org.
Further Reading:
The above information is adapted from transmitted light photography recommendations for conservation documentation as outlined in: